Other Sites of Interest Dunbar Plumbing OutdoorEventSeating.com KoldBreeze.com NKYTalk.com NKYFairs.com

Dunbar Plumbing Forums - Northern Kentucky's 1st DIY Plumbing Forum

Please login or register.

Login with username, password and session length
Advanced search  

News:

CALL DUNBAR PLUMBING 859-359-4833 WWW.DUNBARPLUMBING.COM


Pages: 1 2 [3] 4 5 ... 10
 21 
 on: April 25, 2012, 11:48:55 PM 
Started by DUNBAR PLUMBING - Last post by DUNBAR PLUMBING
After performing this test it revealed that the operation/draining of the two fixtures in the bathroom did not cause a disturbance in the toilet trapway of residual wastewater. This test proved that the clog was isolated and only affecting the toilet itself.
 
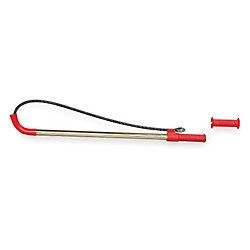
This resulted in our use of a Closet Auger that was more durable than the economical one bought/used by the property owner. We always give the customer top notch approval for trying to attempt to clear an obstruction themselves whenever possible. The reward is solving the problem without the expense of a plumber.
 
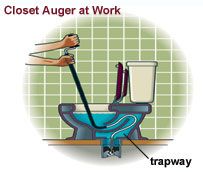
Using the Closet Auger in its design is made to be a handheld, hand crank type drain cable that has a slight hook end with protective covering to protect the trapway of the toilet from porcelain scratching/damage. The goal is to push and turn the closet auger's hand crank as you're using the device, allowing the device to remove/retract the foreign object or obstruction inside the toilet's trapway.

Not always will you retrieve what is blocking the toilet. In cases where soft stoppages exist, it might be excessive toilet paper that is to blame. Others can be the situation of hard or large stools that did not break up through the passage of the trapway. Recent usage of medications or the changing of one's medicine intake can cause an interruption of one's bowel movements resulting in issues such as these that can lead to stoppages or clogged toilets.

The use of the Closet Auger proved successful and the repeated flushing of the toilet to ensure that the trapway was clear offered the guarantee that the stoppage was removed. It is imperative that once a toilet is free from obstruction that multiple flushings take place in order to remove or send the foreign object or matter down the drain line if the Closet Auger does not grab on or retrieve the item causing the blockage.
 
However, (EXCLUSION TO THE ABOVE PARAGRAPH)
 
If you are aware that an object or item is something that might end up causing a clog in the drain piping due to its size or shape, then it's important that the toilet is removed from the closet flange mounted to the floor and attempt to remove the obstruction by retrieval. This will provide the guarantee that the item will not cause future backups in the piping system.

 22 
 on: April 25, 2012, 11:31:12 PM 
Started by DUNBAR PLUMBING - Last post by DUNBAR PLUMBING
 
The property owner attempted to clear the obstruction by repeated use of the plunger and the use of an economy closet auger. This did not resolve the issue given the size of the obstruction in the toilet trapway.
When we arrived to perform the task of the clogged toilet we performed a short diagnostic test of the following:
Ran water down the drain of the adjacent tub

Ran water down the drain of the adjacent lavatory

If either of those two fixtures would of created a disturbance of the water in the trapway of the toilet, that would of led to the obstruction of the drain line, not the toilet in question.

Lateral branches tie into the larger piping that serves the toilet in the bath group it serves. When more than one fixture is affected in a clogged/backed up scenario, this implies that the location of the clog is beyond the toilet, requiring a longer "reach" to break loose the obstruction.


 23 
 on: April 25, 2012, 11:23:45 PM 
Started by DUNBAR PLUMBING - Last post by DUNBAR PLUMBING
A new plumbing customer to Dunbar Plumbing contacted us regarding a clogged toilet at the home. It was mentioned that plunging and the recent purchase of a closet auger did not rectify the situation. Below is an image of a closet auger and its use.

Picture of a Closet Auger


 24 
 on: January 30, 2012, 12:29:44 AM 
Started by DUNBAR PLUMBING - Last post by DUNBAR PLUMBING
Dunbar Plumbing was called out to a repeat customer to replace a 50 gallon gas water heater in the residence. Jonathon Way is located in Independence Kentucky off of Pelly Road. Liberty Orchard Subdivision. The customer supplied us with a new 50 gallon GE Rheem gas water heater from Home Depot.

GE Rheem water heaters are a common product sold at Home Depot for water heaters. When we arrived at the residence, here is the situation we were presented with...


As you can see from the picture above, the flue venting for the furnace along with the water heater are incorrectly installed. This was done by the new construction plumber and HVAC contractor when the house was built. The double wall B-vent that's extending down into the basement. This forced the situation given the dimension of the piping and the fittings to make the connections to the furnace and water heater.

If you look closely, you'll see that the draft diverter hood is altered/smashed down in order for the installation to take place. Here is another picture of the situation once the water heater was cut loose.


 25 
 on: January 03, 2012, 02:58:11 AM 
Started by DUNBAR PLUMBING - Last post by DUNBAR PLUMBING
It's always best to dry fit your assembly of pvc pipe and fittings to make sure that your installation goes smoothly and without error, preventing any issues that affects the fall or "tilt" of your drain piping. It is very important that your drain piping between your two fixed positions are kept in the equation of determining your amount of fall. Fall or "Pitch" is based on a basic rule of 1/8" per foot fall. 1/4" per foot fall can be used as well if the situation warrants. Having "fall" on the piping is necessary to remove the waste water waste matter from the fixture to the drain line leading to the point of disposal. Sewage disposal can be of a septic system or city sewer. Installing drain piping without proper fall or backpitched, piping that is falling the wrong direction can cause buildup in the newly installed drain piping resulting in a smaller area of the pipe's interior area. This also allows for the new drain to collect waste matter which further worsens the chance for a clogged piping system.
 
Once you measure your pipe to fit into your turns of direction, your pvc fittings, it is then safe to clean and glue your pvc pipe together to complete the task of the drain repair. Remember that it is wise to mark your pipe against the fittings by the hubs making sure your pipe fully enters the hub of your fittings. If this isn't done properly what happens is your measurements of pipe will be incorrect causing the distance between fittings to change, resulting in mistakes. Pencil a line on your pipe in a dry fit equation to make sure that when gauging your pipe before installing that the pipe has travelled fully into the hub of your fittings. It is then safe to glue the pipe to the fittings after this is accomplished.
 
Once your piping is installed by the use of glue and mechanical couplings, make sure that the new piping you erected is properly supported by the use of bracing or strapping in the necessary intervals required for the size of pipe installed. Failure to do this can result in sagging of the pvc pipe. PVC pipe has vulnerabilities when it comes to temperature variances. Extreme heating of the pipe caused by the discharge of heated water, for example a dishwasher utilizing 120F temperature. If the piping is not supported within the necessary distances this plastic piping can begin to sag between fixed positions and cause problems with buildup, creating a 'belly' or low spot that can collect waste matter sealing off the path of flow.
 
Once the piping is strapped, make sure that your mechanical couplings are tightened at the clamps by use of a torque wrench to 60 foot pounds of torque. This is the proper measurement that ensures that the coupling is indeed tight to both sides of the dissimilar materials without leakage. Once this is accomplished then you can operate the plumbing fixtures associated with this drain to test for leaks, making sure that the installation of your new piping is done correctly and without error.  Dunbar Plumbing offers partial or complete drain piping replacement in your home. Please contact us at 859-359-4833 to schedule your replacement by our company to get the job done right.


 26 
 on: January 03, 2012, 02:38:22 AM 
Started by DUNBAR PLUMBING - Last post by DUNBAR PLUMBING
The piping with the holes on this job involved roughly less than 10 feet of piping and there was plenty of evidence that the pipe was not only leaking but heavily clogged at the connection to the cast iron stack.  Our first step was to cut the cast iron wye directly below the hub serving the 2" copper drain. We chose to go this route because right where we cut the cast iron hub off was signs of deterioration that spelled trouble for attempting to extract the lead pour, oakum and brass ferrule from the hub. If the cast iron hub was decent, a service weight gasket would be utilized to put back inside the hub along with new 2" PVC pipe.
 
Using a diamond blade angle grinder along with a bi metal sawzall blade we were able to safely remove the hub leaving a short jot of cast iron piping leading directly into the 4" cast iron stack. In removing the hub, we found that the short jot of piping was completely clogged with black waste matter. Quick use of a piece of wire scraped out the pipe back to its original diameter, allowing for uninterrupted flow. At the other end of the pipe, the copper drain piping was cut roughly 2" from the intersecting wye that veers off to carry the waste of a nearby tub. The condition of the copper drain piping was in satisfactory shape from that point forward, limiting the amount of pipe removal.
 
Now that both ends of the drain piping was removed, the next step involved utilizing the correct mechanical fittings that rejoin dissimilar materials together. Cast Iron to PVC - PVC to Copper. The mechanical coupling for each end of this joining of new PVC pipe consists of a rubber type connector with a pair of stainless steel hose clamps and a stainless steel covering to secure the rubber connection from expanding. This is a code requirement in most states in the country and provides the best connection design for this type of repair. This also allows for easy removal of connections if the need for drain cleaning when there is no access.
 
Once the rubber connection (No Hub Mission Coupling) was installed on the short piece of 2" cast iron pipe, from there the transition of pvc pipe is introduced and the direction of the pipe and fittings in pvc generally follow that of the existing. Keep in mind though that pvc pipe fittings will be different than copper and have longer sweeps. This will prevent the ability to cut piping lengths the same size of the copper drain piping that is removed.

 27 
 on: January 03, 2012, 02:21:14 AM 
Started by DUNBAR PLUMBING - Last post by DUNBAR PLUMBING
A repeat customer of ours contacted us to address a leak in the garage of their home on sylvan drive. Sylvan drive is located in independence kentucky. Dunbar Plumbing has done numerous plumbing tasks at this location and the house was built in the 1970 era.

Given the age of this home, Cast Iron was the majority of drain stacks inside this home with the rest of the branches done in copper drain piping. Copper drain work was something that simplified the installation of plumbing and due to the cost of piping in 3" or 4" copper, the use of cast iron was the preferred method. However over time what results in the aging of copper piping, the piping has a predetermined "life" before issues result in its use.

When we arrived at the home, first inspection of the piping arrangement led to the majority of the drainage system piped in the garage area. This along with minor removal of the ceiling revealed what was leaking onto the floor. A 2" copper drain line that connected into the main 4" cast iron stack had evidence of pinholes in the piping in the last foot of piping before transitioning into cast iron. Here is a brief explanation of what to expect on piping systems where cast iron drain piping and copper drain piping are mixed:
 
Most if not always when copper drain piping is used in older homes, a brass ferrule is utilized in the cast iron hub that connects to the larger piping. This, over time creates a situation where the transition itself starts to corrode and close up the inside diameter of the pipe. When this problem occurs, the waste matter that is travelling through the piping system is slowed down and causes buildup in the copper piping leading to the cast iron hub.
 
This area right before the copper enters the cast iron hub is where pinholes, or thinning of the piping occurs. Back in the day when copper drain lines were introduced, the actual thickness of the copper drain piping is paper thin to begin with, roughly 1/16" of an inch. With products such as detergents, acidic food waste, urine, and any other mixtures of household chemicals and products provides a cocktail of fluids/gels/liquids that travel through the copper drain lines and eventually become lodged in the piping whether it is a coating or clumps, gathering in turns or directions of the piping.
 
Over time, this collection of products serves as the problematic issues that lead to pinholes or deterioration of copper piping inside the system, leading to replacement.  It is common to see homeowners using electrical tape, wrapping the piping where the holes are found to be leaking to 'buy time' before finally replacing the piping. This surely is not the correct way to fix a plumbing problem, but nonetheless it is a method that provides a temporary fix until the piping is replaced correctly and according to code.

 28 
 on: October 31, 2011, 11:00:28 PM 
Started by DUNBAR PLUMBING - Last post by DUNBAR PLUMBING
Dunbar Plumbing was contacted by a customer today in Walton Kentucky. The location of this property was close to Mary C. Grubbs Highway where it intersects with US25. Main Street in Walton is the short 2.5 mile section of US25 that stretches from where Walton-Nicholson road intersects with US25 onto Mary C. Grubbs Highway intersection.
 
Customer had an issue with all three fixtures backing up on the second floor of the house.
 
Toilet
Lavatory
Tub
 
Customer mentioned that when the lavatory and/or the tub faucet was ran, the toilet would start to gurgle instantly. Since no other drains were affected in the house, this lead to the issue being isolated to the 2nd floor only in the structure.
 
The customer already removed the toilet before we arrived, as it was confirmed that the drain system would have to be accessed through that vantage point to clear the obstruction. As we noticed upon arrival, wastewater was sitting in the closet bend and any water ran from the tub or lavatory in the same bathroom instantly raised the water level in the closet bend that serves the toilet.
 
Using our medium machine, we inserted our drain cable into the toilet arm to remove the obstruction. What was immediately stopping us was not known initially as we would enter the drain roughly 2 feet approximate and get hung up badly inside the drain. A quite unusual circumstance as the piping leading from the closet flange is minimum 3" and most if not all structures in the Northern Kentucky Area are 4" when stretching 40+ years or older.
 
We made 4-5 attempts to clear the obstruction with next to no success. It was when the property owner pointed out to us in the lower level of the house that all the piping was visible to the bathroom by removal of a panel. This property is new to both the property owner as well us, and the property is being rented by tenants.
 
The house had also sat vacant for a few weeks before being occupied which would be partially the issue at hand why we were called out to clear an obstruction in this drainage system. Once we were able to get a visual on the piping arrangement it was clear to see "why" the cable was jamming up inside the piping arrangement.

The drain piping immediately went from 3" to 4" cast iron piping. The major issue was a tee laying on its side which is a clear code violation in today's requirements. Serving out of the top of this 4" tee was the 2" cast iron drain serving the lavatory drain in the same bathroom. Once that connected to the tee, the drain continues at a slope heading towards a ninety degree turn vertical into the closet and heading towards the basement.  Being able to see this piping arrangement gave us the ability to understand why the cable was jamming inside the tee as it was trying to head back through the 2" drain serving the lavatory drain.

 
With some much needed trial and error, numerous shots into the drain finally got us heading the cable towards the vertical 4" drain pipe heading into the piping. This instantly addressed the clogging issue allowing the water inside the closet bend to slowly start dropping, signifying that whatever was holding back the waste matter and wastewater was finally leaving the piping system. We continued to run the drain cable machine inside the piping and took the drain cable the full length to make sure that the waste matter was clearly out of the drain system.
 
Along with running the tub faucet and lavatory in the same bathroom at full force while the cable was still inside the drain. This technique is a great way to keep all that was built up inside the drain continuing on out, using the water as the helper to rid the piping of waste matter.
 
It was our assumption that during the time this house sat vacant that possibly the toilet was used for the last time before the house went vacant, the waste matter never made it out of the horizontal bend of the piping. This waste matter then had time to sit and solidify including toilet paper that turned into hard paper mache in consistency. With the new tenants arriving and unaware of this situation, the buildup started against this hardened mass inside the piping and eventually closing off the pipe completely, disallowing flow through the pipe.
 
This happens quite frequently when homes are vacated and no one is there to keep the water running through the drains. This situation can happen both in a new home where pvc pipe is commonly found for drainage piping, just as much as say an older home could have with cast iron piping, galvanized or copper. If you have a home whereby you're going to sell in the near future, make sure that when you leave the property for good that the toilets and all fixtures are ran heavily for repeated times to remove any waste buildup inside the piping.

This will prevent the unexpected surprise when the new property owners move in, looking at the previous homeowners like they hid some disasterous piping inside the home that's going to be a chronic problem. (they think)

 
The customer in this case (since the toilet was already pulled) reset the toilet after our job was complete. This was a cost saving measure afforded to the property owner to save money on our expense to show up and resolve the issue. This was a first time customer that reached us via internet through Google trying to find someone to resolve the plumbing issue 'today' as it was the only bathroom in the structure serving the needs of 3 people living in the home.


 29 
 on: October 30, 2011, 08:36:00 PM 
Started by DUNBAR PLUMBING - Last post by DUNBAR PLUMBING
Dunbar Plumbing - Northern Kentucky Plumbers
 
http://stevenienaber.com/northern-kentucky-plumbers/
 
http://howl-o-ween.info/northern-kentucky-plumbers/
 
http://outdooreventseating.com/northern-kentucky-plumbers/
 
http://513online.com/2011/11/01/northern-kentucky-plumbers/
 
http://plumbingforums.wordpress.com/2011/11/04/northern-kentucky-plumbers-dunbar-plumbing-forums/
 
http://barreltrains.com/florence-kentucky-plumbers/
 
http://danthecornman.com/dunbar-plumbing-plumbers-in-northern-kentucky/

 30 
 on: October 16, 2011, 02:24:47 PM 
Started by DUNBAR PLUMBING - Last post by DUNBAR PLUMBING
Here is a video of a three handle to single handle tub and shower faucet conversion in a bathroom. We provided the new delta faucet along with remodel plate to cover the existing three hole pattern in the wall.


This job was located on Marilyn Drive in Independence Kentucky. Repeat customers of Dunbar Plumbing.  We are Northern Kentucky Plumbers providing service plumbing work in the Northern Kentucky area.

Pages: 1 2 [3] 4 5 ... 10